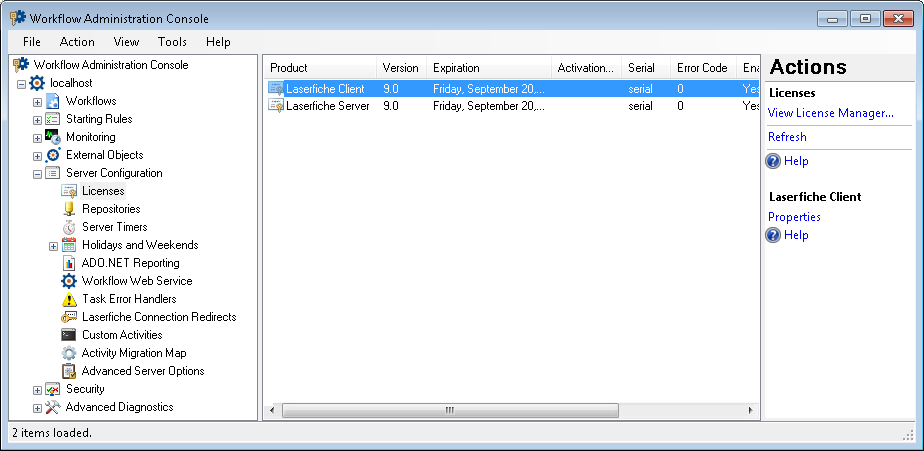
Licenses Node
This node, under Server Configuration in the Workflow Administration Console, lists the licenses provided for Workflow. It also lists the licenses' details, such as the product the license is for, the product's version, the license's expiration date, the license's CD-Key if applicable, the product's serial number, any error codes, and the status of each license. Learn more about licensing.
Optionally, you can view connections (the serial numbers for the Laserfiche Servers that Workflow can connect to), any special features, any add-ons, the license's creation date, its activation date, the company the product is licensed to, and any error messages. Learn more about configuring columns in the Workflow Administration Console.
You can add and delete licenses from this node.
To open this node
- In the Workflow Administration Console's Console Pane, expand the Server Configuration node.
- Select Licenses. The node will list all the licenses.
Tip: You can refresh this list to reflect recent changes by clicking the Refresh link below Licenses in the Actions Pane. Alternatively, right-click the Licenses node and select Refresh.
To add, view, or delete a license
- In the center Details Pane, select a license. Click Properties in the Actions Pane, or right-click the license and select Properties. Alternatively, double-click the license. If no licenses are listed in the Details Pane, click View License Manager in the Actions Pane.
- The Workflow License Manager will open. The Workflow tab shows details about the license and the Products tab allows you to choose a product to view its license and its license's properties.
- Optional: To add a new license, click Import to open the
 Add Workflow License dialog box.
 - Select License file (.licx) if you have an actual license file to provide, and click Browse to navigate to the license.
- Select Online (Activation Key) if you have an activation key, and type the number in the text box.
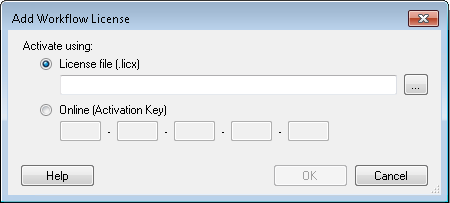
Important: Be sure to provide your 25-digit activation key, not your 16-digit serial number. The serial number will not work for activating your product.
- Optional: You can also Delete a license, or Disable/Enable a license from this dialog box.
- Click Close after making any desired changes.
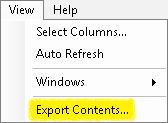
To export the contents of this node in a .csv, .xml, or .txt file
- Select the node in the Console Pane.
- Select View from the main menu.
- Click Export Contents.
- In the Export data dialog box, name the exported file.
- Select CSV File, XML File, or Tab Delimited Text File from the drop-down menu.
- Click Save.